Dual-LND-Hybrid-VPS
This guide is a simpler how-to for implementing Hybrid Mode for 2+ LND Nodes via VPS. The original guide can be found here. When finished, you’ll be able to run one or more of your Lightning Nodes via Tor and obfuscate your Clearnet IP Adress via a paid VPS

Here’s my current setup shared with you, and your intend can be manyfold, you may
- have a dynamic IP from your Internet Service Provider
- want to hide your home IP from the world, for whatever reason
- desire to decrease your Lightning Node HTLC Routing times, so instead of running Tor only, you want Clearnet availability, too
- run more than one Lightning Node, and want both to leverage the same VPN tunnel
- are just curious and want to tinker around a bit, because it’s good to have those skills when demand for experience continues to rise
Table of Content
- Pre-Amble
- Pre-Reads
- Pre-Requisites
- Preperations
- Let’s get started (LFG!)
- Into the Tunnel
- Appendix & FAQ
Pre-Amble
Objective
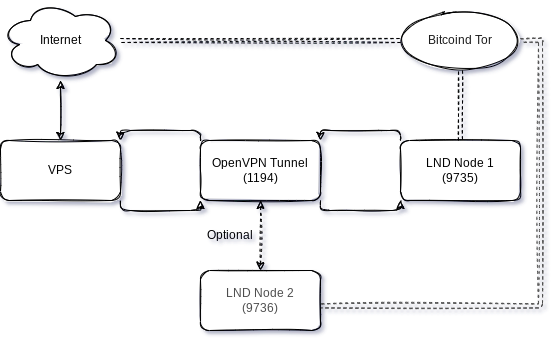
Your own, non-custodial Lightning-Network Node(s) running on both Tor and Clearnet (Hybrid-Mode) installed on a cheap, but anonymous Virtual Private Server (VPS). This guide will outline the scenario for two nodes, so in case you only have one, or more than two, adjust the appropriate steps below.
Challenge
We want payment options with ₿itcoin to be fast, reliable, non-custodial - but the service should ideally not be easily to be identifiable. We also see a lot of reliance on Tor to provide that, which sometimes comes with trade-offs in speed and reliability.
Proposed Solution
There are plenty of ways how to solve for this. This creates hesitance to implement, especially when you’re not very technical. This guide is supposed to provide one approach, whilst there remain many other ways to Rome. Take your time following this through. It might take you 1hr, depending highly on your skill. So don’t go in here in a rush.
Pre-Reads
This guide heavily relies on the intelligence and documentation of others 🙏, but putting those together to one picture creates the last 10% hurdle which is sometimes the highest. Have a careful read through the following articles, to get a deeper understanding on some of the lighter references we’ll be using further below
- Hybrid-Mode for LND
- TURN YOUR SELF HOSTED LIGHTNING NETWORK NODE TO PUBLIC IN 10 MINUTES
- OpenVPN for Docker
Pre-Requisites
- running
lnd-0.14.2-betaor later. This can either be Umbrel, Raspiblitz, MyNode or even a bare RaspiBolt - Technical curiosity and not too shy to use the command-line
- An SSH connection to your node, and to the VPS as well. On Windows, use something like putty and get putty-gen, too
- VPS Account at DigitalOcean or any alternative VPS Solution out there offering similar capabilities (it’s critical they offer a public IP for you)

Disclaimer: this is a ref link, gets you $100 in credit over 60 days, while the cheapest option we use here comes at a cost of $5/month.
Preperations
The better we prepare, the more we can deal with blindspots and the unexpected.
Make notes
It’s generally advised to document your own steps. Make a bucket-list of things you’ve done, and a ToDo to go through in case your environment changes. Imagine yourself 18 months from now, you want to setup this new hardware-node: Will you remember all the steps or extra corners you’ve taken? Suggested Laundry-List, you can tick them off while you go through this guide
- IP-Adresses of VPS external, VPS Tunnel, Node Tunnel
- Ports which needs forwarding
- ToDos
- Questions / open items
Visualize
Some of us are visual people. Draw your diagram to get an idea how you want things to flow
Secure
It goes without saying, but this guide doesn’t go into the necessary security steps in detail, and can’t take on liability for any things breaking or losing funds. Ensure you don’t get reckless, start with small funds you’re ok to lose. Keep an eye on developments or in touch with the active Telegram Groups, to get news and updates with low delays. Also, would recommend to do those steps with a peer, so you follow a second pair of eye review. Lastly, 2fa / yubikeys are your friends!
Let’s get started (LFG!)
Well, let’s get into it, shall we?!
Lightning Node
In this guide, we will consider you have two Lightning Nodes up and running, connected via Tor and some funds on it. You also have SSH access to both and administrative privilidges.
VPS: Setup
In case you don’t have a VPS provider already, sign-up with my referal or pick another which provides you with a static IP and cheap costs. Maybe you even prefer one payable with Lightning ⚡, like LunaNode. In case you go for DigitalOcean, here are the steps to create a Droplet, shouldn’t take longer than a few minutes:
- add a new Droplet on the left hand navigation
- chose an OS of your preference, I have Ubuntu 20.04 (LTS) x64
- take the Basic Plan with a shared CPU, that’s enough power. You can upgrade anytime if necessary
- Switch the CPU option to “Regular Intel with SSD”, which should get you down to $5/month
- You don’t need an extra volume, but pick a datacenter region of your liking
- Authentication: Chose the SSH keys option and follow the next steps to add your public keys in here for secure access. For Windows, with putty and putty-gen referenced above, you should be relatively quick to use those keys instead of a password. For Linux users, you probably know your ways already.
- Add backups (costs), Monitoring or IPv6 if you wish to, however this guide won’t use any of those items
- Lastly, chose a tacky hostname, something which resonates with you, eg myLNBits-VPS
After a few magic cloud things happening, you have your Droplet initiated and it provides you with a public IPv4 Adress. Add it to your notes! In this guide, I’ll refer to it as VPS Public IP: 207.154.241.101
VPS: Connect to your VPS and tighten it up
Connect to your VPS via SSH root@207.154.241.101 and you will be welcomed on your new, remote server. Next steps are critical to do right away, harden your setup:
- Update your packages:
apt-get updateandapt-get upgrade - Install Docker:
apt-get install docker.io - Enable Docker automated start:
systemctl start docker.service - Enable Uncomplicated Firewall (UFW) and add ports to be allowed to connected to:
$ apt install ufw $ ufw default deny incoming $ ufw default allow outgoing $ ufw allow OpenSSH $ ufw allow 9735 comment 'LND Main Node 1' $ ufw allow 9736 comment 'LND Main Node 2' $ ufw enable - Follow further hardening steps, eg setting up non-root users for additional security enhancements.
- Install fail2ban to protect your SSH user, it runs automatically on it’s own
sudo apt install fail2ban
VPS: Install OpenVPN Server
Now we will get OpenVPN installed, but using a Docker Setup like Krypto4narchista suggests here. It’s easier to setup, but needs some tinkering with port forwarding, which we will go into in a bit.
export OVPN_DATA="ovpn-data"which sets a global-name placeholder for your VPN to be used for all the following commands. You can make this permanent by adding this to survive any reboot vianano .bashrc, add it to the very bottom => CTRL-X => Yes.docker volume create --name $OVPN_DATAnotice how the $ indicates picking up the placeholder you have defined abovedocker run -v $OVPN_DATA:/etc/openvpn --rm kylemanna/openvpn ovpn_genconfig -u udp://207.154.241.101, whereby you need to adjust the 207.154.241.101 with your own VPS Public IP.docker run -v $OVPN_DATA:/etc/openvpn --rm -it kylemanna/openvpn ovpn_initpkithis generates the necessary VPN certificate password. Take your password manager and create a secure pwd, which you will store safely. It will be needed once we create client-configuration files for your node to connect later.docker run -v $OVPN_DATA:/etc/openvpn -d -p 1194:1194/udp -p 9735:9735 -p 9736:9736 --cap-add=NET_ADMIN kylemanna/openvpnthis works under two assumptions. If any of those aren’t true, you need to adjust your settings, either on your node, or by starting the docker container with different ports: 1) your current LND Node 1 configuration is listening on port 9735, which you can verify by looking into yourcat ~/.lnd/lnd.conf=>[Application Options]=>listen=0.0.0.0:97352) your second LND Node 2 configuration is listening on port 9736, which you can verify by looking into yourcat ~/.lnd/lnd.conf=>[Application Options]=>listen=0.0.0.0:9736
Your OpenVPN Server is now running, which means the Internet can now connect to your VPS via ports 9735 and 9736 (and 22 SSH of course), and it has a closed tunnel established on port 1194. You need to complement your notes with the IP-Adresses which are essentially added with the running server.
- CONTAINER-ID:
docker psto list your docker container. In the first column, you will find theCONTAINER-ID, usually a cryptic 12-digit number/character combination. Copy into the clipboard and make a note of it. - Docker Shell: Get into the container, with
docker exec -it <CONTAINER-ID> sh. - VPS Docker IP: Run
ifconfigand you typically find 3 devices listed with IPs assigned. Make a note of the one with eth0, which is your ownVPS Docker IP: 172.17.0.2. Typeexitto get out of the docker-shell.
VPS: Retrieve the OpenVPN config & certificate
In this section we’ll switch our work from setting up the server towards getting your LND node ready to connect to the tunnel. For this, we will retrieve and transfer the configuration files from your VPS to your nodes 1 and 2.
docker run -v $OVPN_DATA:/etc/openvpn --rm -it kylemanna/openvpn easyrsa build-client-full NODE-NAME1 nopasswherebyNODE-NAME1should be changed to a unique identifier you chose. For example, if your LND Node is called “BringMeSomeSats”, I suggest to use that - with all lowercase.docker run -v $OVPN_DATA:/etc/openvpn --rm -it kylemanna/openvpn easyrsa build-client-full NODE-NAME2 nopasswherebyNODE-NAME2should be changed similar for LND Node 2.docker run -v $OVPN_DATA:/etc/openvpn --rm kylemanna/openvpn ovpn_getclient NODE-NAME1 > NODE-NAME1.ovpnwhich will prompt you to provide the secure password you have generated earlier. Afterwards, it’ll storebringmesomesats.ovpnin the directory you currently are.- Do the same for your Node 2:
docker run -v $OVPN_DATA:/etc/openvpn --rm kylemanna/openvpn ovpn_getclient NODE-NAME2 > NODE-NAME2.ovpn
VPS: Assign a fixed IP to the VPN tunnel for each node
In order to edit the data for the Docker volume, you must first switch to the superuser/root account
sudo su
cd /var/lib/docker/volumes/ovpn-data/_data/ccd/
nano NODE-NAME1
-> fill with: ifconfig-push 192.168.255.6 192.168.255.5
-> CTRL-x -> y -> RETURN
Repeat for the second node
nano NODE-NAME2
-> fill with: ifconfig-push 192.168.255.10 192.168.255.9
-> CTRL-x -> y -> RETURN
The third node would have the IP extension .14 / .13. and the fourth node get the .18 / .17.
The node side of the tunnel is always assigned the higher number, e.g. .6 and the server is assigned e.g. .5.
To activate the settings reboot the VPS $ reboot or restart the docker container $ docker restart <Docker-ID> and $ exit the superuser/root.
On the node side you will later check the IP assignment with the command $ ip add show tun0.
Into the Tunnel
We have installed the tunnel through the mountain, but need to get our LND Node to use it.
LND Node: Install and test the VPN Tunnel
Now switch to another terminal window, and SSH into your Lightning Node 1. We want to connect to the VPS and retrieve the VPN-Config file, to be able to establish the tunnel. Repeat the step for Lightning Node 2, with the ovpn-configuration file name adjusted.
$ cd ~
$ mkdir VPNcert
$ scp user@207.154.241.101:/home/user/bringmesomesats.ovpn /home/admin/VPNcert/
$ chmod 600 /home/admin/VPNcert/bringmesomesats.ovpn
Note: You need to adjust user, the VPS Public IP and the absolute directory where the ovpn file is stored. We keep a copy of the cert file in the home directory for backup, but the actual file we use is CERT.conf.
Now we need to install OpenVPN, start it up to see if it works.
Important Warning: Depending on your network-setup, there is a slight chance your LND Node Service gets interrupted. Be aware there might be small down-times of your lightning node, as we will reconfigure things. Be patient!
$ sudo apt-get install openvpn
$ sudo cp -p /home/admin/VPNcert/bringmesomesats.ovpn /etc/openvpn/CERT.conf
$ sudo systemctl enable openvpn@CERT
$ sudo systemctl start openvpn@CERT
You should see something similiar to the following output. Here you will now also find your previously assigned IP address 192.168.255.6 and the server peer 192.168.255.5 for the tunnel.
* openvpn@CERT.service - OpenVPN connection to CERT
     Loaded: loaded (/lib/systemd/system/openvpn@.service; enabled; vendor preset: enabled)
     Active: active (running) since Wed 2022-04-06 13:11:13 CEST; 4s ago
       Docs: man:openvpn(8)
             https://community.openvpn.net/openvpn/wiki/Openvpn24ManPage
             https://community.openvpn.net/openvpn/wiki/HOWTO
   Main PID: 1514818 (openvpn)
     Status: "Initialization Sequence Completed"
      Tasks: 1 (limit: 18702)
     Memory: 1.0M
        CPU: 49ms
     CGroup: /system.slice/system-openvpn.slice/openvpn@CERT.service
             `-1514818 /usr/sbin/openvpn --daemon ovpn-CERT --status /run/openvpn/CERT.status 10 --cd /etc/openvpn --config /etc/openvpn/CERT.conf --writepid /run/openvpn/CERT.pid

Apr 06 13:11:13 debian-nuc ovpn-CERT[1514818]: WARNING: 'link-mtu' is used inconsistently, local='link-mtu 1541', remote='link-mtu 1542'
Apr 06 13:11:13 debian-nuc ovpn-CERT[1514818]: WARNING: 'comp-lzo' is present in remote config but missing in local config, remote='comp-lzo'
Apr 06 13:11:13 debian-nuc ovpn-CERT[1514818]: [207.154.241.101] Peer Connection Initiated with [AF_INET]207.154.241.101:1194
Apr 06 13:11:14 debian-nuc ovpn-CERT[1514818]: TUN/TAP device tun0 opened
Apr 06 13:11:14 debian-nuc ovpn-CERT[1514818]: net_iface_mtu_set: mtu 1500 for tun0
Apr 06 13:11:14 debian-nuc ovpn-CERT[1514818]: net_iface_up: set tun0 up
Apr 06 13:11:14 debian-nuc ovpn-CERT[1514818]: net_addr_ptp_v4_add: 192.168.255.6 peer 192.168.255.5 dev tun0
The tunnel between your LND Node and your VPS VPN is established. If you need to troubleshoot, call the systemctl journal via
sudo journalctl -u openvpn@CERT -f --since "1 hour ago"
You can safely repeat this step at the second LND Node 2 now. The established tunnel won’t effect your current running operations, and you need the tunnel IP of your second node for the next step for the port-forwarding table. If we don’t know the IP, how should we tell the VPS where each package should go?
VPS: Add routing tables configuration into your droplet docker
Back to your terminal window connected to your VPS. We have the VPN Client Node 1 IP: 192.168.255.6 and VPN Client Node 2 IP: 192.168.255.10 now, which we need to tell our VPS where it should route those packets to. To achieve that, we’ll get back into the docker container and add IPTables rules.
- Remember how to get into the container? Arrow-up on your keyboard, or do
docker psanddocker exec -it <CONTAINER-ID> sh - Doublecheck your VPN Client IP, and adjust it in the following IPtables commands you enter into the container and confirm with Enter
$ iptables -A PREROUTING -t nat -i eth0 -p tcp -m tcp --dport 9735 -j DNAT --to 192.168.255.6:9735
$ iptables -A PREROUTING -t nat -i eth0 -p tcp -m tcp --dport 9736 -j DNAT --to 192.168.255.10:9736
$ iptables -t nat -A POSTROUTING -d 192.168.255.0/24 -o tun0 -j MASQUERADE
$ exit
What we basically do here, is assign a ruleset to say: As soon a packet arrives at device eth0 on port 9735/tcp, forward it to the VPN client at 192.168.255.6:9735, the same for 9736, and vice versa everything at device tun0. If you have different ports or IPs, please make adjustments accordingly.
Permanent saving of IPtable rules
Your VPS needs operational maintenance, and a reboot sometimes isn’t avoidable. If you want to make the above iptable entries permanent, follow these steps:
- Follow this step again to get into the container, arrow-up on your keyboard, or do
docker psanddocker exec -it <CONTAINER-ID> sh - within the container, change the directory
cd /etc/openvpnand open the environment-settings file for OpenVPN viavi ovpn_env.sh. Nano isn’t installed in the docker container, follow the vi-cheatsheet PDF if you get confused (and you will). Add the following lines to the file
$ iptables -A PREROUTING -t nat -i eth0 -p tcp -m tcp --dport 9735 -j DNAT --to 192.168.255.6:9735
$ iptables -A PREROUTING -t nat -i eth0 -p tcp -m tcp --dport 9736 -j DNAT --to 192.168.255.10:9736
$ iptables -t nat -A POSTROUTING -d 192.168.255.0/24 -o tun0 -j MASQUERADE
$ exit
save with :wq and now your VPS adheres to those rules after a reboot, too.
LND Node: LND adjustments to listen and channel via VPS VPN Tunnel
We switch Terminal windows again, going back to your LND Node. A quick disclaimer again, since we are fortunate enough to have plenty of good LND node solutions out there, we cannot cater for every configuration out there. Feel free to leave comments or log issues if you get stuck for your node, we’ll be looking at the two most different setups here. But this should work very similar on MyNode, Raspibolt or Citadel.
Caution: If your second name is “Dangerously”, do the same with the second LND Node now. But I would strongly suggest to finish running LND with Main Node 1 first, before you repeat this step at Node 2 just with the different port of 9736.
Also, be very cautious with your lnd.conf. Make a backup before with cp /mnt/hdd/lnd/lnd.conf /mnt/hdd/lnd/lnd.bak so you can revert back when things don’t work out.
The brackets below indicate the section where each line needs to be added to. Don’t place anything anywhere else, as it will prevent your LND from starting properly.
Adjust ports and IPs accordingly!
Click here to expand Raspibolt settings
LND.conf adjustments, open with `sudo nano /mnt/hdd/lnd/lnd.conf` [**Application Options**] | Command | Description | | --- | --- | | `externalip=207.154.241.101:9735` | # to add your VPS Public-IP | | `nat=false` | # deactivate NAT | [**tor**] | Command | Description | | --- | --- | | `tor.active=true` | # ensure Tor is active | | `tor.v3=true` | # with the latest version. v2 is going to be deprecated this summer | | `tor.streamisolation=false` | # this needs to be false, otherwise hybrid mode doesn't work | | `tor.skip-proxy-for-clearnet-targets=true` | # activate hybrid mode | `CTRL-X` => `Yes` => `Enter` to save LND Systemd Startup adjustment | Command | Description | | --- | --- | | `sudo systemctl restart lnd.service` | apply changes and restart your lnd.service. It will ask you to reload the systemd services, copy the command, and run it with sudo. This can take a while, depends how long your last restart was. Be patient. | | `sudo tail -n 30 -f /mnt/hdd/lnd/logs/bitcoin/mainnet/lnd.log` | to check whether LND is restarting properly | | `lncli getinfo` | to validate that your node is now online with two uris, your pub-id@VPS-IP and pub-id@Tor-onion | ``` "03502e39bb6ebfacf4457da9ef84cf727fbfa37efc7cd255b088de426aa7ccb004@207.154.241.101:9736", "03502e39bb6ebfacf4457da9ef84cf727fbfa37efc7cd255b088de426aa7ccb004@vsryyejeizfx4vylexg3qvbtwlecbbtdgh6cka72gnzv5tnvshypyvqd.onion:9735" ```
Click here to expand Raspiblitz 1.7.x settings
LND.conf adjustments, open with `sudo nano /mnt/hdd/lnd/lnd.conf` [**Application Options**] | Command | Description | | --- | --- | | `externalip=207.154.241.101:9735` | # to add your VPS Public-IP | | `nat=false` | # deactivate NAT | [**tor**] | Command | Description | | --- | --- | | `tor.active=true` | # ensure Tor is active | | `tor.v3=true` | # with the latest version. v2 is going to be deprecated this summer | | `tor.streamisolation=false` | # this needs to be false, otherwise hybrid mode doesn't work | | `tor.skip-proxy-for-clearnet-targets=true` | # activate hybrid mode | `CTRL-X` => `Yes` => `Enter` to save RASPIBLITZ CONFIG FILE `sudo nano /mnt/hdd/raspiblitz.conf` since Raspiblitz has some LND pre-check scripts which otherwise overwrite your settings. | Command | Description | | --- | --- | | `publicIP='207.154.241.101'` | # add your VPS Public-IP | | `lndPort='9735'` | # define the LND port | | `lndAddress='207.154.241.101'` | # define your LND public IP address | `CTRL-X` => `Yes` => `Enter` to save LND Systemd Startup adjustment | Command | Description | | --- | --- | | `sudo systemctl restart lnd.service` | apply changes and restart your lnd.service. It will ask you to reload the systemd services, copy the command, and run it with sudo. This can take a while, depends how long your last restart was. Be patient. | | `sudo tail -n 30 -f /mnt/hdd/lnd/logs/bitcoin/mainnet/lnd.log` | to check whether LND is restarting properly | | `lncli getinfo` | to validate that your node is now online with two uris, your pub-id@VPS-IP and pub-id@Tor-onion | ``` "03502e39bb6ebfacf4457da9ef84cf727fbfa37efc7cd255b088de426aa7ccb004@207.154.241.101:9736", "03502e39bb6ebfacf4457da9ef84cf727fbfa37efc7cd255b088de426aa7ccb004@vsryyejeizfx4vylexg3qvbtwlecbbtdgh6cka72gnzv5tnvshypyvqd.onion:9735" ```
Click here to expand Raspiblitz 1.8.x settings
LND.conf adjustments, open with `sudo nano /mnt/hdd/lnd/lnd.conf` [**Application Options**] | Command | Description | | --- | --- | | `externalip=207.154.241.101:9735` | # to add your VPS Public-IP | | `nat=false` | # deactivate NAT | [**tor**] | Command | Description | | --- | --- | | `tor.active=true` | # ensure Tor is active | | `tor.v3=true` | # with the latest version. v2 is going to be deprecated this summer | | `tor.streamisolation=false` | # this needs to be false, otherwise hybrid mode doesn't work | | `tor.skip-proxy-for-clearnet-targets=true` | # activate hybrid mode | `CTRL-X` => `Yes` => `Enter` to save RASPIBLITZ LND-checkup FILE `sudo nano /home/admin/config.scripts/lnd.check.sh` since Raspiblitz has some LND pre-check scripts which otherwise overwrite your settings. Go to line 184 or search for `enforce PublicIP if (if not running Tor)`. Comment out those 5 lines indicated here: ``` # if [ "${runBehindTor}" != "on" ]; then # setting ${lndConfFile} ${insertLine} "externalip" "${publicIP}:${lndPort}" # else # when running Tor a public ip can make startup problems - so remove # sed -i '/^externalip=*/d' ${lndConfFile} # fi ``` `CTRL-X` => `Yes` => `Enter` to save LND Systemd Startup adjustment | Command | Description | | --- | --- | | `sudo systemctl restart lnd.service` | apply changes and restart your lnd.service. It will ask you to reload the systemd services, copy the command, and run it with sudo. This can take a while, depends how long your last restart was. Be patient. | | `sudo tail -n 30 -f /mnt/hdd/lnd/logs/bitcoin/mainnet/lnd.log` | to check whether LND is restarting properly | | `lncli getinfo` | to validate that your node is now online with two uris, your pub-id@VPS-IP and pub-id@Tor-onion | ``` "03502e39bb6ebfacf4457da9ef84cf727fbfa37efc7cd255b088de426aa7ccb004@207.154.241.101:9736", "03502e39bb6ebfacf4457da9ef84cf727fbfa37efc7cd255b088de426aa7ccb004@vsryyejeizfx4vylexg3qvbtwlecbbtdgh6cka72gnzv5tnvshypyvqd.onion:9735" ```
Click here to expand Umbrel Pre-0.5 & Citadel settings
LND.conf adjustments, open with `sudo nano /home/umbrel/umbrel/lnd/lnd.conf` [**Application Options**] | Command | Description | | --- | --- | | `externalip=207.154.241.101:9735` | # to add your VPS Public-IP | | `nat=false` | # deactivate NAT | [**tor**] | Command | Description | | --- | --- | | `tor.active=true` | # ensure Tor is active | | `tor.v3=true` | # with the latest version. v2 is going to be deprecated this summer | | `tor.streamisolation=false` | # this needs to be false, otherwise hybrid mode doesn't work | | `tor.skip-proxy-for-clearnet-targets=true` | # activate hybrid mode | `CTRL-X` => `Yes` => `Enter` to save LND Restart to incorporate changes to `lnd.conf` | Command | Description | | --- | --- | | `cd umbrel && docker-compose restart lnd` | This can take a while. Be patient. | | `tail -n 30 -f ~/umbrel/lnd/logs/bitcoin/mainnet/lnd.log` | check whether LND is restarting properly | | `~/umbrel/bin/lncli getinfo` | validate that your node is now online with two uris, your pub-id@VPS-IP and pub-id@Tor-onion | ``` "03502e39bb6ebfacf4457da9ef84cf727fbfa37efc7cd255b088de426aa7ccb004@207.154.241.101:9736", "03502e39bb6ebfacf4457da9ef84cf727fbfa37efc7cd255b088de426aa7ccb004@vsryyejeizfx4vylexg3qvbtwlecbbtdgh6cka72gnzv5tnvshypyvqd.onion:9735" ```
Click here to expand Umbrel Version 0.5.x settings
LND.conf adjustments, open with `sudo nano /home/umbrel/umbrel/lnd/lnd.conf` [**Application Options**] | Command | Description | | --- | --- | | `externalip=207.154.241.101:9735` | # to add your VPS Public-IP | | `nat=false` | # deactivate NAT | [**tor**] | Command | Description | | --- | --- | | `tor.active=true` | # ensure Tor is active | | `tor.v3=true` | # with the latest version. v2 is going to be deprecated this summer | | `tor.streamisolation=false` | # this needs to be false, otherwise hybrid mode doesn't work | | `tor.skip-proxy-for-clearnet-targets=true` | # activate hybrid mode | `CTRL-X` => `Yes` => `Enter` to save LND Restart to incorporate changes to `lnd.conf` | Command | Description | | --- | --- | | `~/umbrel/scripts/app stop lightning && ~/umbrel/scripts/app start lightning` | same applies here: Be patient. | | `tail -f ~/umbrel/app-data/lightning/data/lnd/logs/bitcoin/mainnet/lnd.log` | Check the logs | | `~/umbrel/scripts/app compose lightning exec lnd lncli getinfo` | Check the two Uris looking like below | ``` "03502e39bb6ebfacf4457da9ef84cf727fbfa37efc7cd255b088de426aa7ccb004@207.154.241.101:9736", "03502e39bb6ebfacf4457da9ef84cf727fbfa37efc7cd255b088de426aa7ccb004@vsryyejeizfx4vylexg3qvbtwlecbbtdgh6cka72gnzv5tnvshypyvqd.onion:9735" ```
Celebrate and wrapper
Now the moment of truth: once you tested the reboot, checked the LND log, and lncli getinfo shows you both the Tor and the VPS Clearnet IP as uris, you’re done. curl https://api.ipify.org responds with your VPS Clearnet-IP, too. LN gossip will soon populate your IP offering, and aggregator sites like Amboss or 1ml will pick it up. Time to celebrate 🍻
or troubleshoot where things could have gone wrong. If the former: Congratulations - you made it!
Hope you enjoyed this article. Please do share feedback and suggestions for improvement.
If this guide was of any help, I’d appreciate if you share the article with others, give me a follow on X  or nostr, perhaps even donating some sats to hakuna@getalby.com
I’m also always grateful for incoming channels to my node: HODLmeTight
Appendix & FAQ
I’m stuck and have no idea why it’s not working. Who can help?
Please add an issue on Github with your question and provide as much detail as possible. Keep it safe though, no macaroon or user-ids!
Why DigitalOcean - can’t we pick a VPS where we can pay with Lightning, and anonymously
Consider this guide a work-in-progress. I’ve picked DigitalOcean since I know what I’m doing there. Heard good things about Luna Node, it’s cheaper and you can pay with sats, so will test this out next. Also happy to add further alternatives, leave comments if you think these can accomplish the same results. Fee free to provide suggestions here.
Can I add even more nodes connecting to the tunnel? If so, how?
Yes, you need to handle your port-forwarding appropriately, since every node needs their unique LND listen port. Eg Node 1 has 9735, Node 2 9736 and so on. Docker runs need to be called with further -p for publish-options, IPtable rules and UFW needs to be adjusted. But once you got this guide internalised, the principle should be clear. Otherwise, let me know.